- Choosing sumo or conventional
- How to breath and brace
- Technique: Sumo and conventional
- Common mistakes: Sumo and Conventional
- Mindset
- Equipment
- Choosing assistance exercises
One of the most common deadlift question I get is, “should I pull sumo or conventional?”
It’s a really good question.
Often people will start by looking at their bone structure, which is a fine starting point, but there are so many other factors than bone structure when determining which deadlift stance you should use.
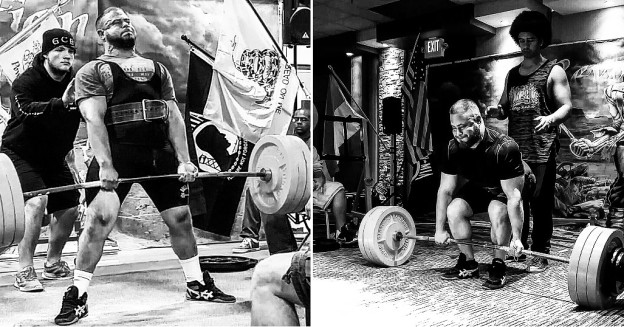
Take myself for example.
I could be suited for either stance, and there’s nothing outwardly indicating that deadlift would be my best lift.
There’s a lot going on inside of you that you can’t see.
That’s why to ultimately determine which you’re stronger at, you have to try both at some point. Give adequate time to each and you’ll find which feels more comfortable and natural to you.
If you don’t try both, you’ll never know.
Take my client, Nick for instance:
https://instagram.com/p/9Ug2w7pmBG
He had spent years doing conventional deadlift. He made significant progress on his pull, but it never felt *right* to him.
After one session going over the sumo deadlift, he was already smashing his all-time deadlift PR!
In this article, I’ll cover the technique for both in detail. You will notice that the sumo and conventional do have their differences, but they also share many similarities.
The same over-arching principles also apply to both:
- Move the weight fast, or intend to.
- Stay tight.
- Keep the bar close to your body
Technique and proper programming are crucial.
With a couple technique fixes and a short peaking program, my client, Scott went from a 620 to 660 deadlift.
The best program in the world won’t work if your form is off.
A big deadlift starts with good technique. So let’s get to it.
Breathing and Bracing
To get a big deadlift, you have to learn to stay tight.
Develop tension by creating a solid brace so you can maintain your position and technique throughout the lift, without your form breaking down.
Here are the steps for breathing, bracing and staying tight for sumo and conventional:
- Maintain a neutral position position.
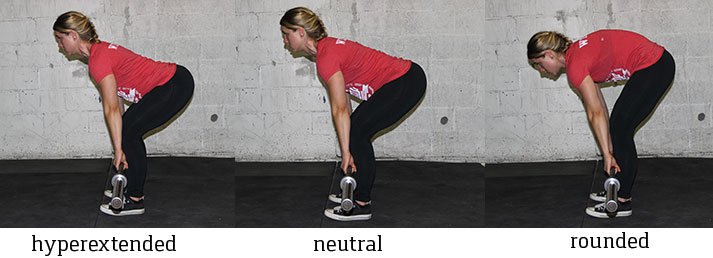 Image via nerdfitness.com
- 360° of air. Take a big breath of air into your lower back — fill the entire belted area with air and hold it.
- Flex your abs hard like you’re about to get punched in the stomach and straighten your back.
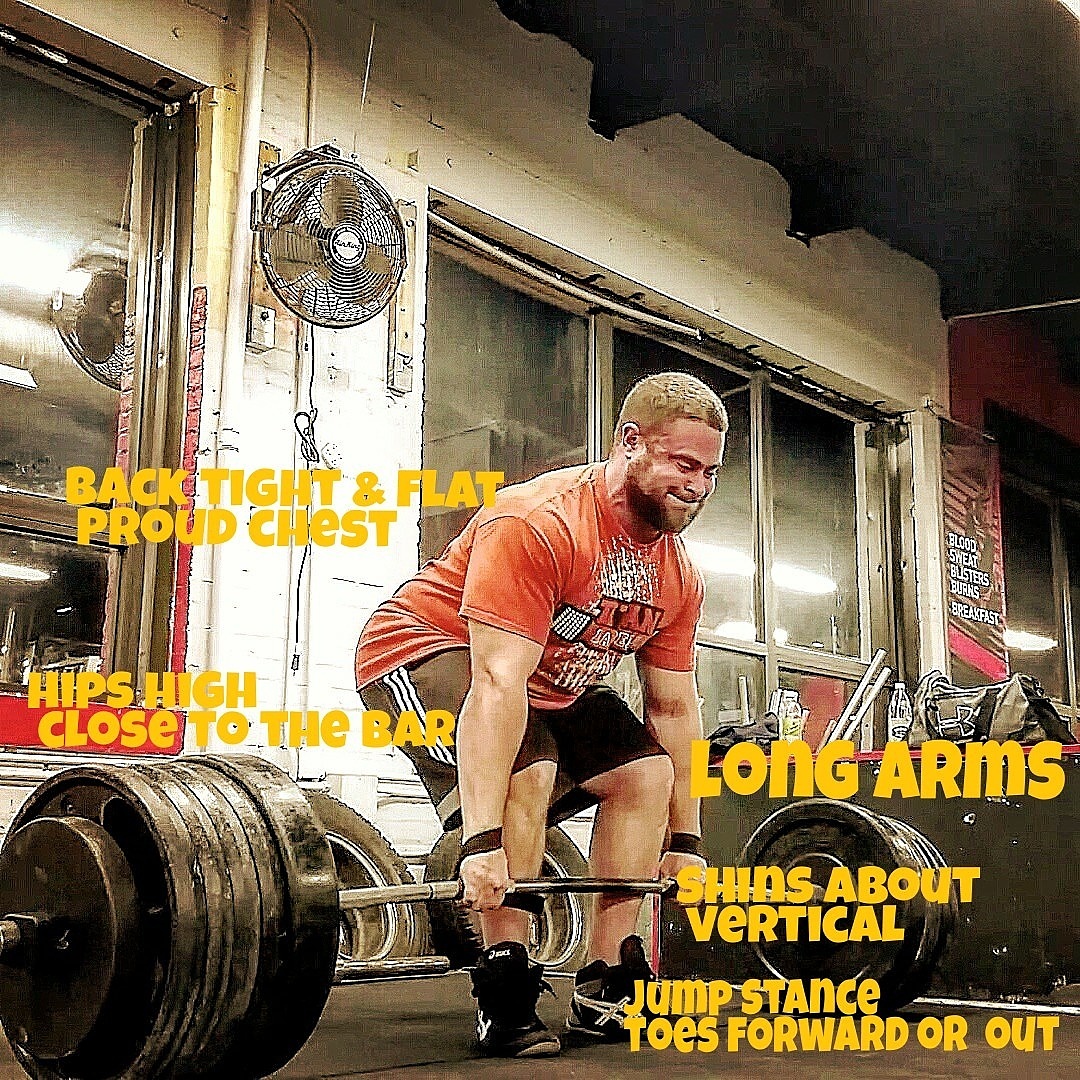
Sumo Deadlift
- Start with the bar a few inches from your shins. When you initiate the lift the bar should skim your body.
- Feet outside shoulder width like a wide stance low bar squat. Toes pointed out. Stance is very individual, you’ll find what’s optimal over time.
- Grip the bar tight. Arms long and straight down.
- Big air. Fill your midsection (starting with the area your belt covers) with air and abs tight.
- Open your groin and hips up to push your knees out.
- Create a ton of tension to the bar. Pull the slack out of the bar and try to bend it over your knees.
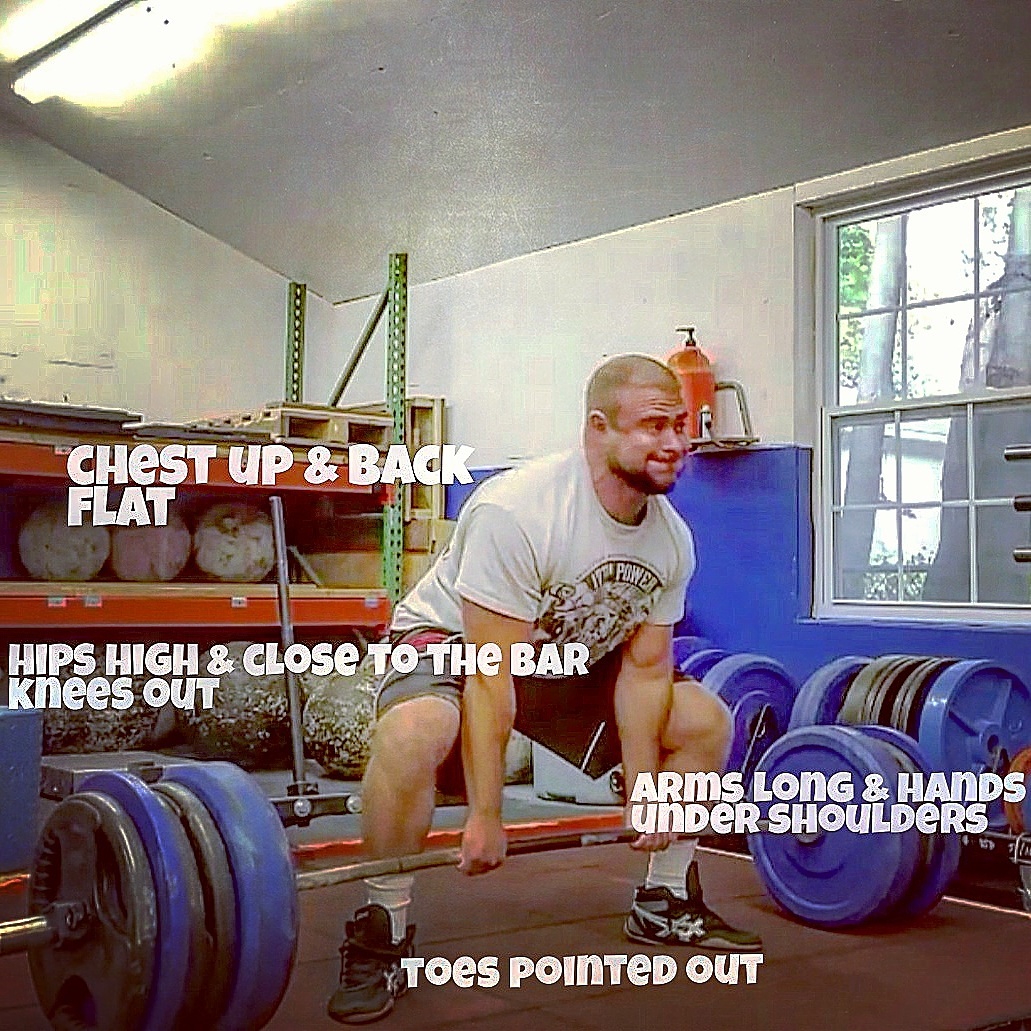
- Use the bar as a counterbalance to pull yourself into position. Get tall by pulling your chest up.
- Keep your hips high and close to the bar like you’re trying to touch your groin to it. Careful not to drop your hips too low like a squat.
- Weight on your heels and drive them through the floor. Push the floor away explosively, trying to bust open the seams on the outsides of your shoes.
- Lock your knees as the bar passes them.
- Lockout hard. Squeeze your glutes like you’re trying to crack a walnut between your butt cheeks.
- Hump the bar and throw your weight back like you’re trying to throw a 45lb plate off your back without hyperextending your low back.
Common Mistakes
Squatting the Weight
https://instagram.com/p/3NOjyeJmK9
A low hip position like the bottom of a squat is an inefficient starting position. It’s very difficult to develop any power.
Generally, a slightly higher hip position with a relatively upright torso will be a more optimal starting position.
Conventional deadlifting your sumo deadlift
You’re setup sumo: wide stance, narrow grip, but the hips are too far away from the bar, chest is too horizontal and the knees are not out.
This is essentially a wide stance conventional.
Keep your knees out, hips pulled close to the bar, and an upright torso.
Locking Hips Before Knees
As soon as the bar passes your knees, lock them so you can pull your hips through.
You will use your glutes more effectively once your knees are locked, allowing for an efficient lockout.
If your hips lockout before your knees, it can be extremely difficult to lockout.
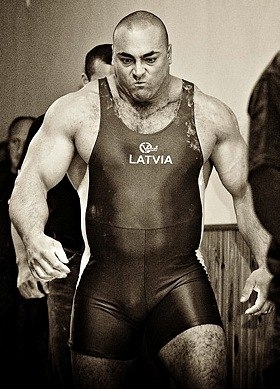
World record deadlifter, Andrey Belyaev does this perfectly.
Pull, Push and Pull
I think of the deadlift as a 3 part movement: Pull, Push and Pull
Pull
You’re using the bar to pull yourself into the proper position.
Pull the slack out. Pull your hips close to the bar. Pull your chest up.
Although you haven’t initiated the movement, your setup creates so much tension that it feels like you have already started.
Push and Pull
You’ve pulled yourself into your starting position. You’re set and ready to go.
Push the floor away from you as hard as you can. Use your legs to drive the ground away.
Continue to push with your legs.
As the bar nears lockout, pull your hips through. Squeeze you glutes and hump the bar hard. Pull your shoulders back without hyperextending at your lower back.
Conventional Deadlift
- Jumping stance. Feet approx hip width. Toes pointed out or straight forward depending on preference.
- Start with your shins a few inches from the bar.
- Make your arms long and grip the bar just outside your hips.
- Tight brace. Neutral spine. Big breath – 360° of air. Tight abs.
- Push your butt back to the wall behind you. Hinge your hips back as far as you can until your hamstrings stretch and prevent you from moving them any further. Shins stay relatively vertical the entire time.
- Grip the bar, back flat and lats tight. Create tension to the bar.
- Use the weight as a counter balance. Keeping your weight back, use the bar to pull your hips down into place and drive your chest up. Build tension in your hamstrings.
- Mentally commit to the lift. Stay tight and be aggressive!
- *PUSH* the floor away using your legs. Drive your heels through the ground.
- Lock out hard. Squeeze your glutes to pull your hips through. Hump the bar and stand tall with a proud chest.
The conventional deadlift follows the same pull/push/pull method.
Pull yourself into your starting position.
Push the weight off the floor with your legs. Keep pushing and pull your hips through by squeezing your glutes and lock your shoulders back into place.
Common Mistakes
Lower back rounding
Often when you try to pull the weight off the floor your hips hike up and your back rounds like the letter “C”.
We always refer to the deadlift as a pull, so it’s easy to understand why this is such a common mistake.
Prevent lower back rounding by simply bracing and using good leg drive, following the Pull/Push/Pull.
Squatting your deadlift
One of the most common mistakes a see is lifters getting their hips too low, trying to squat the weight up.
This is a weak/disadvantageous starting position and the bar will start further from your body, forcing you to pull it closer to you as you initiate the lift.
Keep your weight back behind the bar. Start closer to a half squat position with your hips above your knees.
People often point out great deadlifters like Mikhail Koklyaev and Eddie Hall starting in a low position.
Take a look at when they actually “hit” the weight and initiate the movement. You’ll notice their hips are in a normal starting position.
Mindset
 Tight and aggressive.
I used to overthink the deadlift a ton. Overtime I developed strategies to clear my mind.
This somewhat of a difficult concept to talk about. Being aggressive doesn’t mean throw everything out the window, go crazy and lift.
You want to be focused.
Focus your energy on the doing the things that allows you to move the weight as efficiently and quickly as possible.
The deadlift is different than many of the other lifts because it’s concentric only, just up.
In the squat you start with a heavy weight on your back which can make setting up more challenging.
The deadlift starts on the floor and you can setup however you want.
It’s so important to practice and hone your setup so you can find your optimal position and be as *explosive* as possible.
One tip that has helped me is to start with a checklist. A list of cues to find my optimal starting position (hips back, big air, back tight, etc.).
Use this checklist and occasionally take a session, or do your warmups, and slow your setup down while still being explosive when you lift.
Pattern the movement — it will become automatic.
Your setup will become something you do by feel, rather than a list of cues. This removes the clutter from your head.
Now you’ll naturally find your optimal starting position and you can commit 100% to moving the weight as fast as possible.
Equipment
Shoes
Sumo: I prefer wrestling shoes. They are flat, almost no sole and grippy. You push out against your shoes more in the sumo than conventional, so I prefer something grippy and high top.
Conventional: I wear socks to keep low to the ground. You’re pushing straight through the floor so you don’t really need the grip. If you have to wear a shoe, I prefer wrestling shoes or deadlift slippers.
Belt
I wear a 10mm Inzer Single Prong belt. I tend to do a lot of beltless work and belt up at around 80 – 85% and higher.
Keep a neutral spine. Take a big breath of air and fill the entire belted area up with air. Flex your abs hard like you’re going to get punched in the stomach.
Learn how to breathe and brace properly into your belt so you can safely lift more.
Chalk, Straps, & Baby Powder
I always use chalk when deadlifting. It prevents the bar from sliding in my hands. I haven’t found my grip to ever be a limiting factor on heavy attempts.
I use straps on many of my assistance movements. Straps protect my hands from my calluses tearing and I don’t want my grip to be the limiting factor on high rep deadlift exercises.
You can apply Baby Powder to your legs when you’re gearing up for a heavy pull to reduce the amount of friction. Just make sure you don’t get it on your hands.
Deadlift Assistance Work
Make sure your technique is dialed in. Simple technique flaws are often the cause of many missed lifts.
Next, identify your weaknesses and improve them through the right assistance movements.
“You’re only as strong as your weakest link.”
Reps
Practice makes perfect.
Practice the movement with submaximal loads. This allows you to build strength and work on perfecting your form.
Try resetting after each rep for more practice honing your technique.
Stay tight and be aggressive.
Many weaknesses are due to technical inefficiencies. I find this to be especially true when lifters can’t get the bar to budge off the floor. Rep work is great for learning to find and develop power through your optimal starting position.
Deficit Deadlift
Deadlift standing on a raised surface. Rubber matting is a great surface to stand on. 1 – 3” surface.
Great for strength off the floor and lockout. This will force you to use more leg drive out of the bottom and the increase ROM makes it challenging to lockout.
Can be done sumo or conventional.
I do not recommend these for beginners. It’s challenging to get into proper position and can reinforce poor technique.
Speed Deadlift
Deadlift using a lighter weight. Anywhere from 50 – 80% of your 1RM, reps 1-5, with rest period at 30 – 60 seconds.
Great way to work on technique and explosiveness. Helps for developing speed off the floor and lockout.
You can add accommodating resistance, like bands or chains to this to have the weight lighter off the floor and heavier towards lockout.
I prefer chains over bands for a more natural bar path.
Paused Deadlift
Personally I prefer this for more beginner/intermediate lifters, although it can be used by advanced lifters as well.
Perform the lift, pause at your weakest point, and complete the lift.
If you were weak right off the ground, pause the second the bar leaves the floor. Float it an inch above the ground (or your weakest point) for 1 to 5 seconds and the complete the lift.
Creates more time under tension at your sticking point. This will allow you to build muscle and intuitively find your strongest position, while paused at your weakest point in the deadlift.
Forces you to brace properly and stabilize the spine, preventing lumbar flexion or low back rounding.
It will force you to keep everything tight, including your lats. This will keep the bar close to your body and allow you to keep your chest upright. This will create a better bar path allowing you to finish the lift more efficiently.
Improved technique. You will learn how to stay tighter and more controlled, even at your weakest point.
Romanian Deadlifts (RDL)
RDL’s are one of my favorite assistance movements.
There’s a million ways to RDL. This is one of my favorites.
Legs straight with a slight bend in the knee (soft knees).
Back tight.
Push your butt back to the wall behind you.
Hamstrings will tighten as your hips go back, when you can’t move back and further, squeeze your glutes hard and hump the bar. The bar will generally travel to around your knees or just below.
Great for building your entire posterior chain. It’s also great for learning how to hinge and extend your hips.
Sumo RDL
For a variation more specific to the sumo deadlift, perform the same way as a conventional RDL with a moderate sumo deadlift stance.
Block Pulls
Common Question: Block Pulls vs. Rack Pulls?
I prefer block pulls to rack pulls for transference to my deadlift for three reasons.
- Some racks simply don’t go low enough. This won’t allow you to do pulls raised at 2” – 4”.
- The second reason is because the bar is resting on the safety pins for rack pulls, the tension is already taken out of the bar. This creates a very different pull than a rack pull where the weight is resting normally, just on a raised surface. This makes it more true to a normal deadlift.
- Block pulls don’t ruin the barbell. Heavy rack pull bend and warp the bar overtime, making the bar only useful for rack pulls.
Put the weights on blocks (raised platforms) at or just below your sticking point. Pull with the same technique you would from the floor.
Block pulls can be done from just about any height, so they can be done to improve sticking points off the ground or lockout.
They can also be done to overload the movement. I prefer pulling sumo off the blocks to overload.
It allows you to keep your hips close to the bar with an upright torso. The improved leverage allows you to handle more weight for reps, which is great for building upper body strength and musculature.
Squats are great for building that leg strength and drive off the floor.
Front squats: Great for building leg/quad, core and upper back strength.
Back squats, safety squat bar (SSB) squats: great for building leg and overall strength.
Box squat with deadlift stance: Great for building strength through a ROM similar to the deadlift.
Good Morning’s (GM)
Good Morning’s are awesome for building your entire posterior chain and for developing bigger, stronger glutes and hamstrings.
They’re a really simple and effective movement.
With your weight on your heels and knees slightly bent, hinge your hips back by pushing your butt back to the wall behind you.
When your hamstrings are fully stretched, stand up through your heels and squeeze your glutes like you’re trying to crack a walnut between your butt cheeks. Return to a standing position.
Hit your low back and erectors more by standing in a narrow stance like your conventional deadlift.
Try a more hip dominant variation by taking a wider stance like your squat or sumo deadlift.
Both variations are great for building your deadlift, and a bigger, stronger backside.
Rows/Shrugs
There are no secrets to building a big, strong upper back; barbell rows, dumbbell rows, t-bar rows, and various types of shrugs. The old school basics are simple and they work!
Building your back is good no matter what your sticking point is. A strong back will make it easier to keep the bar close to you. If the bar travels away from you during the deadlift it can cause your low back to round.
If you experience this or missing at the knees, it could be due to weak lats.
There are tons of other variations for bringing up your deadlift. Assistance work should not be chosen at random. Choose exercises that target *your* weaknesses and work to increase strength and hypertrophy.
With the proper program and technical improvements you can make significant progress in your deadlift in a rather short amount of time.
My clients, Allen and Heather have made a massive improvement in their deadlift’s in little time with simple technique changes and short peaking cycles.
https://instagram.com/p/8CPQu8obKE/
https://instagram.com/p/9b-og3gYfp/
One thing I stress to anyone looking for a bigger deadlift is to get a lot of practice deadlifting.
Do a lot of submaximal rep work to gain strength, hypertrophy, speed and technical mastery. You do not need to deadlift heavy (90%+) frequently to gain strength.
Most of my work through the year is in the 60 – 89% range. I actually won’t go above 95% for the deadlift leading up to a meet. I will test my max at the meet.
In training for my first 700 deadlift, I only pulled above 600+ in training twice. Three weeks out from the meet I did a single at 635 and a single at 655. That was it.
I trusted in my program and knew that when I went to test my max on the platform, 700 would be there.
Don’t get in the habit of thinking you need to test your 1RM all the time. If you are constantly testing your 1RM, you’re not giving yourself time to build your strength.
Testing too frequently is an easy way to stall and risk injury. And the easiest way to stop making progress is to get injured.
If you’re looking for more on individualized programming, send me an email at adamnpine@gmail.com with “PROGRAM QUERY” in the subject line.
In summary, to choose the stance best for you, take the time at some point during your powerlifting career to try both.
A big deadlift starts with good technique. Be a tactician. Learn how to setup and perform the deadlift efficiently. Stay tight and be aggressive!
Gain technical mastery through repetition. Once your technique is on point, identify your weaknesses. Address them through good programming and choosing the proper assistance work.
Want a Bigger Deadlift?
Drop your name and e-mail below and I’ll send you a free copy of my Deadlift Training Manual.

This is some good information. I would love pick you brain on hip height for both of these deadlift styles.
Absolutely, Charley. Shoot me an email, adamnpine@gmail.com
Pingback: Weekly Reading Round-Up 11/29 | Jorden Pagel Fitness
Pingback: Stuff To Read While You're Pretending To Work: 11/27/15
After reading this my brain is full and about to explode. Great work Adam and congrats on making the PTDC articles of the week.
Pingback: Best Fitness Articles - November 15, 2015 - Personal Trainer Development Center